Recently, I endeavored to put together a slightly nicer sound system since I was reorganizing my desk anyways- the existing setup consisted of a pair of large "white van scam" speakers liberated from their third or fourth owner for the lowly sum of $20 and a no-name 15W per channel amp borrowed from my dad's "parts bin" of assorted audio equipment. The system put out adequate sound, but to be perfectly honest it wasn't going to win over any audiophiles. The bass extension was reasonable enough but the midrange and tweeter sounded muddy, and tweaking the onboard knobs on the speakers was more apt to make one channel drop out intermittently than help anything.
So then, my mission was to get a better pair of smaller speakers and an amp to drive a much nicer sound system for my new computer. I was intrigued by the idea of building my own set of bookshelf speakers, and I didn't want to spend a whole lot of money otherwise. While I weighed my options on the speakers, the almost universally glowing reviews of the Lepai LP-2020A+ amp caught my eye. A 20W per channel amp that supposedly sounded amazing for the bargain price of $20? It seemed almost too good to be true.
After ordering one on Amazon I hooked it up to a pair of good home built bookshelf speakers- also on loan from the parts bin- to get a baseline idea of what I was working with. The sound was reasonable enough. With the tone defeat on it sounded rather flat and tinny, but with the tone circuit engaged it was easy to tweak into sounding pretty decent for the price tag. Not exactly "amazing" as some reviewers had raved, but certainly quite nice for only costing 20 bucks.
The unit is not without its flaws, however. The QC on the amp is more than just a bit dubious; the PCB itself was actually designed wrong, so the 3.5mm headphone jack input has its stereo channels reversed. The RCA jacks are fine, but such an elementary error doesn't exactly inspire confidence in the quality of manufacture. It's a simple fix- just reverse your speaker wires if you use the 3.5mm jack- but a fix you really should not have to do in the first place. Inside, there are little dots of soldering flux here and there but the solder joints all seem to be pretty well sorted. The only glaring shortcoming would be the low quality of the components. They're not utter garbage, but definitely made to the price point. Finally, it might seem like a nitpick, but the bright blue LED ring around the volume knob was just too damn bright, especially when it sits in my peripheral vision while on my desk.
The guts, as it came:

It seemed that a lot of the shortcomings of the Lepai were due to subpar internals, and so replacing the capacitors, inductors, and op-amps would yield a great improvement in sound quality. Since I have basic soldering skills, I figured it would make a nice side project. I put together a bill of materials for replacing all the important components and picked some suitable replacements online, mostly higher quality Nichicon and Panasonic capacitors. Once everything had arrived, I got down to business and desoldered both the through-hole caps and the surface mount op-amps on the tone/volume circuit:

You can see I marked the PCB with sharpie to prevent any confusion, but it turned out that it wasn't necessary- the negative side of the caps and pin 1 on the op-amps were already marked for installation at the factory.
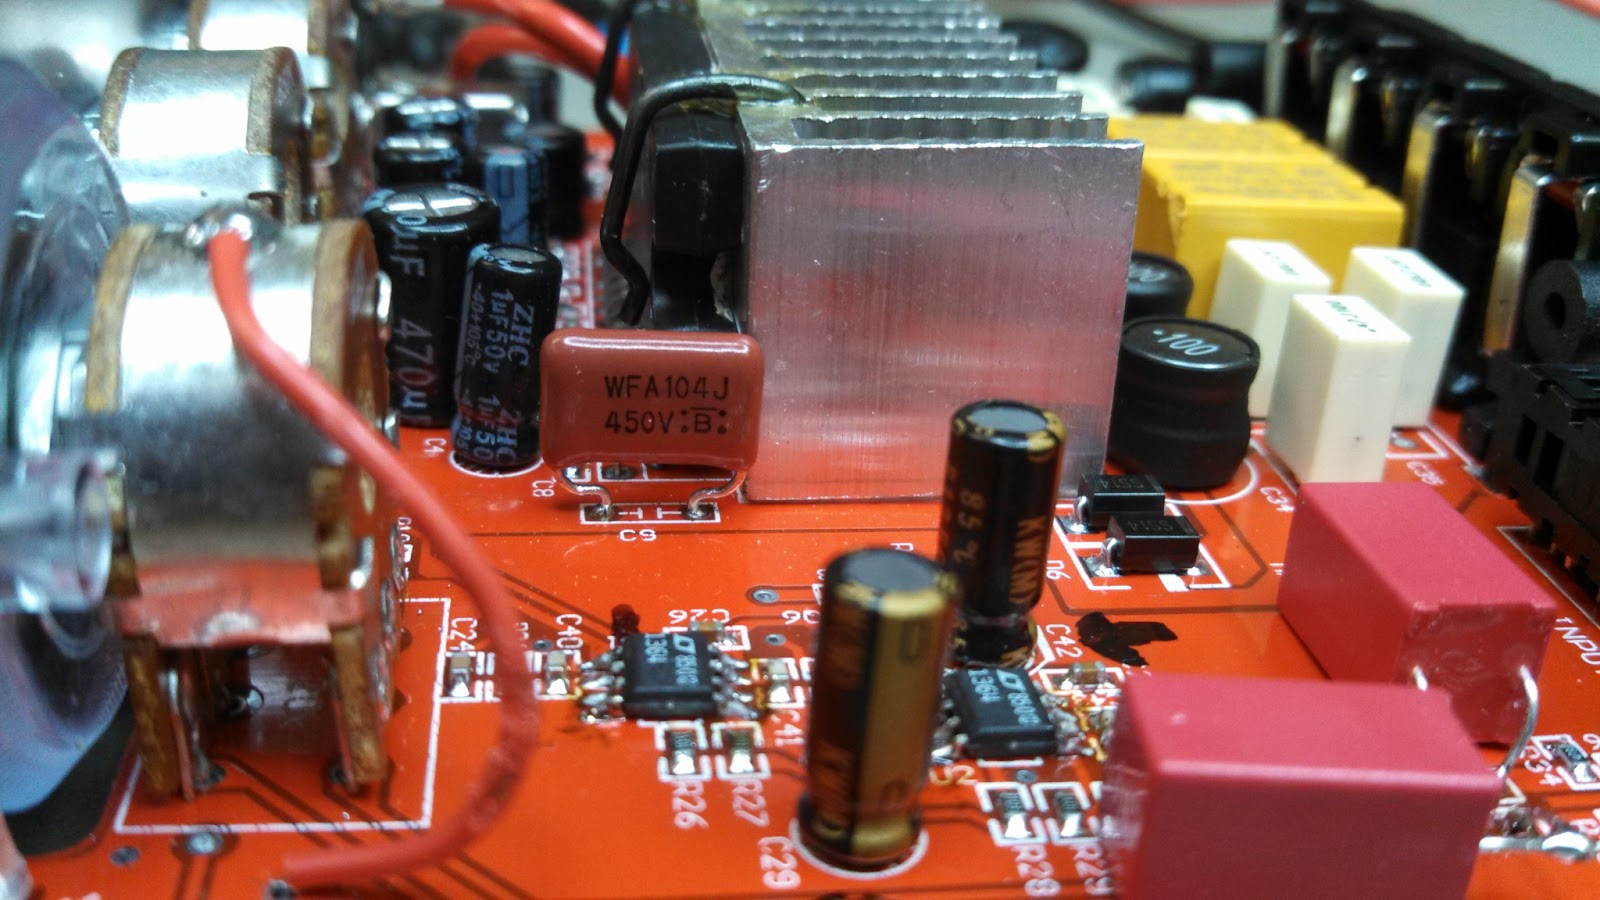
Any high quality op-amp like an LM4562/OPA2107/LT1364 will do for the replacement. I went with Linear Technology's LT1364:

Installed onto the PCB along with the Nichicon caps:

The surface mount soldering was a bit of a challenge, considering how small the pins are on the op-amp. It's certainly not going to win any beauty contests, but it's functional.
If you look closely in the last picture, you will notice that the surface mount capacitors on C30 and C31 have been removed- these were originally ceramic capacitors which are pretty much universally regarded as unfit for audio applications due to their properties. These were the coupling caps for the input signal, so it would be a clear improvement to replace them with something better. The replacement film caps were much larger than the ceramic caps, but they secured to the surface mount pads quite solidly with a bit of solder. I also had to solder on a bit of extra wire onto C30's leads to get it to fit on the PCB comfortably:

Again, never going to win any beauty contests but it's functional. Next up, off with the inductors and the output capactiors:

Cleaning the leftover solder out of the holes took a seriously powerful soldering iron and a desoldering wick, and left some big splotches of burnt rosin on the underside of the PCB:

I'm not killing this board, I swear! It looks ugly but it's actually just a brown residue that wipes away with some rubbing alcohol. The new caps and inductors went on without a fuss:

Note the one output cap upside down just to drive those of us with OCD berserk. I didn't even notice at the time, but film capacitors are nonpolar so it doesn't really matter.
Another cap that came out turned out to have different sized lead spacing than the replacement I bought. On the left is the original, right is the replacement:

Not to worry though, because some simple work with a pair of needle nose pliers evens out the lead spacing:

And in it goes without a fuss:
Next up was the main power capacitor. The original one was rated at 2200μF and 16V, but this was grievously under spec. Most people went to 4700μF or higher, I chose a 5600μF unit rated at 25V. The voltage rating was much higher as an added safety margin. The problem this posed was that the new capacitor was much larger:

In fact, if it was mounted flush against the PCB the unit would not fit back into its housing. The fix was simple enough since the clearance was off by only a few millimeters at most. Affixing the capacitor slightly tilted in relation to the PCB let it go in without an issue:

The last part of note was the nonpolar caps in C20 and C21. The spots on the board for them were actually marked as polar:

Not a big deal, though I still ended up putting the shorter lead through the negative marked hole as a force of habit. In went the rest of the caps and a set of replacement white LEDs that will light up at a lower intensity:

The finished, modded PCB:

A pile of the old parts I stripped off:

And the bottom of the PCB, after cleaning most of the burnt rosin residue off:

Finally, plugging it in and flipping the power switch!

The modded unit passed what I coined "the other POST"- the "Power On Smoke Test" with flying colors. No buzzing, no smoking, no fuss.
The moment of truth was upon me, then: did all this work actually make a difference?
Yes, yes it did. It made a positively amazing difference. Everything sounded much fuller- the bass response was better, the mid range sounded nicer, and the overall range was much more clear. There was a massive difference with the tone circuit bypass, which now sounds almost as good as with the tone circuit engaged. There is a slight difference in the gain between the two settings, but I still prefer to have the tone circuit engaged. This improvement was not just placebo effect either, I had a number of impartial listeners remark about how good it sounds now. All told, the parts cost me about $15, so it was a significant investment in terms of the original cost of the unit. That said, for $35 this thing kicks ass. I'm very impressed with it at the price point. Of course it's not going to stand up to top end stuff and it doesn't have gobs of power to drive bigger or more inefficient speakers, but all told I'm positively thrilled with how it came out.
The only caveat I would give is that this unit really shines after all the mods but is just average before them. If you don't know how to solder or don't want to take this unit apart to mod it, you might not like it as much as I did.
EDIT: I've gotten requests to post up the parts list for what I replaced.
IMPORTANT! Be aware that this is for the PCB that is marked "LEPY LP2020A+ 130416PCB" and if your unit is a different revision, the location of components may have changed. If you find a discrepancy, just replace the cap with a higher quality one of the same specifications. The only caps I altered the spec on were the main power cap (C1 got a higher capacitance and voltage rating) and the coupling caps (C30 and C31 got film caps of the same spec)- in both cases they should be relatively easy to find even if their number has changed.
U1 and U2 replaced with Linear Technology LT1364 (or your favorite equivalent op amp)
C1 replaced with Panasonic EEU-HD1E562B (or equivalent 5600µF 25V cap)
C3 replaced with Nichicon UKW1C471MPD (or equivalent 470µF 16V cap)
C4 and C10 replaced with Nichicon UKW1H010MDD (or equivalent 1µF 50V caps)
C9 replaced with Panasonic ECW-F2W104JAQ (or equivalent .1µF 450V cap)
C14 and C15 replaced with Nichicon UFW1A221MED (or equivalent 220µF 10V caps)
C20 and C21 replaced with Panasonic ECE-A1HN2R2U (or equivalent 2.2µF 50V bipolar caps)
C28 and C29 replaced with Nichicon UKW1C101MDD (or equivalent 100µF 16V caps)
C30 and C31 replaced with WIMA MKS2C043301K00JSSD (or equivalent 3.3µF 63V film caps- whatever you can manage to fit)
C32, C33, C35, C36, C38, and C39 replaced with Kemet R82EC3470DQ70J (or equivalent .47µF 100V caps)
L1 replaced with Bourns 6100-100K-RC
L2, L3, L4, L5 replaced with Wurth 744732100